AirflowのQuick Startを参考にして、WSL Ubuntu 20.04上にAirflowをインストールする。
以下はQuick Startからの抜粋。
# Airflow needs a home. `~/airflow` is the default, but you can put it
# somewhere else if you prefer (optional)
export AIRFLOW_HOME=~/airflow

# Install Airflow using the constraints file
AIRFLOW_VERSION=2.4.0
PYTHON_VERSION="$(python --version | cut -d " " -f 2 | cut -d "." -f 1-2)"
# For example: 3.7
CONSTRAINT_URL="https://raw.githubusercontent.com/apache/airflow/constraints-${AIRFLOW_VERSION}/constraints-${PYTHON_VERSION}.txt"
# For example: https://raw.githubusercontent.com/apache/airflow/constraints-2.4.0/constraints-3.7.txt
pip install "apache-airflow==${AIRFLOW_VERSION}" --constraint "${CONSTRAINT_URL}"

# The Standalone command will initialise the database, make a user,
# and start all components for you.
airflow standalone

# Visit localhost:8080 in the browser and use the admin account details
# shown on the terminal to login.
# Enable the example_bash_operator dag in the home page
airflow standaloneを実行した結果、airflow.cfg ファイルが作られる。
ls airflow/
airflow-webserver.pid  airflow.cfg  airflow.db  logs  standalone_admin_password.txt  webserver_config.py
airflow.cfg の先頭50行を抜粋。様々な変数に値が格納されている。環境変数を使用して、デフォルトの値をオーバーライドができるらしい。
You can override defaults using environment variables
変数の詳細やデフォルト値については構成リファレンスを参照する。
[core]
# The folder where your airflow pipelines live, most likely a
# subfolder in a code repository. This path must be absolute.
dags_folder = /home/bluen/airflow/dags

# Hostname by providing a path to a callable, which will resolve the hostname.
# The format is "package.function".
#
# For example, default value "airflow.utils.net.getfqdn" means that result from patched
# version of socket.getfqdn() - see https://github.com/python/cpython/issues/49254.
#
# No argument should be required in the function specified.
# If using IP address as hostname is preferred, use value ``airflow.utils.net.get_host_ip_address``
hostname_callable = airflow.utils.net.getfqdn

# Default timezone in case supplied date times are naive
# can be utc (default), system, or any IANA timezone string (e.g. Europe/Amsterdam)
default_timezone = utc

# The executor class that airflow should use. Choices include
# ``SequentialExecutor``, ``LocalExecutor``, ``CeleryExecutor``, ``DaskExecutor``,
# ``KubernetesExecutor``, ``CeleryKubernetesExecutor`` or the
# full import path to the class when using a custom executor.
executor = SequentialExecutor

# This defines the maximum number of task instances that can run concurrently per scheduler in
# Airflow, regardless of the worker count. Generally this value, multiplied by the number of
# schedulers in your cluster, is the maximum number of task instances with the running
# state in the metadata database.
parallelism = 32

# The maximum number of task instances allowed to run concurrently in each DAG. To calculate
# the number of tasks that is running concurrently for a DAG, add up the number of running
# tasks for all DAG runs of the DAG. This is configurable at the DAG level with ``max_active_tasks``,
# which is defaulted as ``max_active_tasks_per_dag``.
#
# An example scenario when this would be useful is when you want to stop a new dag with an early
# start date from stealing all the executor slots in a cluster.
max_active_tasks_per_dag = 16

# Are DAGs paused by default at creation
dags_are_paused_at_creation = True

# The maximum number of active DAG runs per DAG. The scheduler will not create more DAG runs
# if it reaches the limit. This is configurable at the DAG level with ``max_active_runs``,
# which is defaulted as ``max_active_runs_per_dag``.
max_active_runs_per_dag = 16

# Whether to load the DAG examples that ship with Airflow. It's good to
# get started, but you probably want to set this to ``False`` in a production
airflow.cfg の中にexecutor = SequentialExecutor という記述がある。SequentialExecutorというオプションでは、タスクをシングルインスタンスで実行するらしい。SequentialExecutor 以外にもLocalExecutor, CeleryExecutor, DaskExecutor, KubernetesExecutor, CeleryKubernetesExecutor といったExecutorが存在する。各Executorについては、Executor Types を参照してみるとよさそう。
今回は airflow standalone コマンドでAirflowサーバを起動したため、あくまでスタンドアロン、つまり SequentialExecutor となっている模様。
ちなみに、 airflow standalone コマンドでは、以下のコマンドをまとめて実行してくれているらしい。ざっと見る限り、DBを起動してユーザ作成し、ウェブサーバを起動してスケジューラーを起動しているっぽい。
DBは何に使っているのか?あとスケジューラーは何者?
疑問はいったん脇において、ウェブサーバに入ってみたいと思う。
airflow db init

airflow users create \
    --username admin \
    --firstname Peter \
    --lastname Parker \
    --role Admin \
    --email spiderman@superhero.org

airflow webserver --port 8080

airflow scheduler
ブラウザで http://localhost:8080/login/ にアクセスする。UsernameとPasswordは airflow standalone コマンドを実行したときに出力されていた値を利用する。以下のように出力されているはず。
standalone | Airflow is ready
standalone | Login with username: admin  password: kTBTQWBKZAP2S5Ns
standalone | Airflow Standalone is for development purposes only. Do not use this in production!
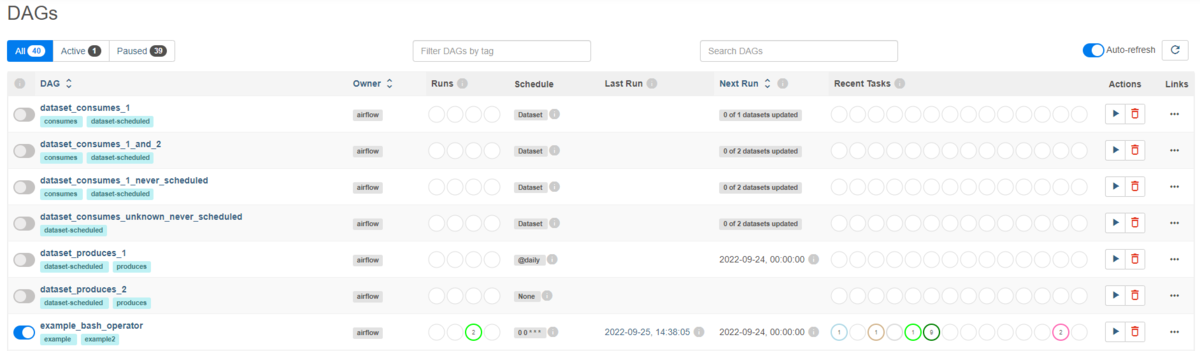
ログインすると、次のような画面が表示される。DAGがすでに40件登録されている。

GUI上で、example_bash_operator の▶ボタンをクリックして、DAGを実行してみる。DAGが実行されていることがわかる。
DAGの詳細を見てみる。example_bash_operator は何をやっているのだろう?よくわからない。。。
色々疑問が残ったがとりあえず先にすすもう。
次回は、AirflowのTutorialをやってみようと思う。